
Rewilding my Lawn
In which the E@L replaces a useless monoculture of turf with a colorful pollinator garden
E@L Episode #26-08
Grass. It is the hallmark of the “perfect home”, and the bane of many a homeowner. Personally, I hate mowing lawns. I’ve been doing it since I was old enough to push a lawn mower in my father’s yard, which, at half an acre, was pretty big for a suburban family. I’ve always been allergic to grass clippings which makes mowing it an exercise in immuno-masochism. Owning a lawn mower is a curse of home ownership, so I’ve advised my offspring never to acquire one. They only lead to misery.
My current home sits on ¾ of an acre and came with a used riding mower. Despite my aversion to mowing, it’s still much cheaper than paying for the service, which would cost as much as the mower every year. I hired a mowing service one year that my mower wasn’t working, which prompted me to spend the money to rebuild it. Then I sold it and bought a new zero-turn radius mower, which I love, but still.
Lawns, generally and collectively, are a blight on the landscape
Suburban lawns are the biggest irrigated crop in the United States, covering over 40 million acres, or 2% of our arable land. They are a non-functional monoculture of unproductive plants that displace a much wider diversity of natural vegetation and wildlife. Manicured lawns are wildlife dead zones. Maintaining them requires periodic addition of weed-killing poisons that run off into our waterways and pollute our groundwater, and since all the houses in my subdivision use well water, we are just poisoning ourselves.
I have never used weed killers or fertilizer on my lawn and have just let it do whatever it wants, which means I probably have more weeds than grass now. My lawn stands (sits?) in marked contrast to my neighbor’s across the street, which is manually manicured and chemically cultivated to 99.9% purebred monoculture with nary a weed in sight. It’s my honor to be the seed bank for all the dandelions in the neighborhood, though my neighbors might not agree.
The major problem with turf grass lawns is that they do not provide any nutritious nectar or seeds to pollinators. Pollinators, including bees, butterflies, and moths are critically important for pollinating most of our fruit crops. But many are in decline. The United States is home to 3600 species of bees, but 29% of them are now declining or vulnerable, and some may already be extinct. Honeybees are not included in this list, as they are imported from Europe. We also host over 540 species of butterflies, but they have decreased by 22% since 2000.
Last year I decided it was time to reduce the amount of grass that I mow by converting part of my lawn into a pollinator sanctuary. I am, in essence, rewilding it. For background research, I visited a native plant arboretum in Delaware and came away with a long list of unmemorable plant names that I have since forgotten, and the impression that it could be a lot of work. Nonetheless, he persisted. After much more reading, I was finally prepared to begin my rewilding journey. Here is the path I traveled:
Step One: Make a Plan, Stan
Making a plan seemed like it would require a lot of work, and I initially thought I would just wing it. But failing to plan is planning to fail, or some such nonsense. Before starting my rewilding process, I imported a satellite photo of my yard into a presentation program (which I’ll just call PP) and added some shapes to indicate trees, both existing and future-fantasy-dream trees.
About ten years ago I planted two arbor-day-give-away oak tree saplings in my front yard, which was entirely grass. At present they are both about 15 feet tall and are beginning to offer some shade to the yard, nutrition for caterpillars, support for one or two bird nests, as well as an the appearance of political leanings. My plan was to use those trees as the corners of a large pollinator garden that would eventually take up most of the front yard. Using PP, I laid out the size of my ‘garden’, which would be about 50 x 30, or 1500 square feet, about the same footprint as my house.
Before purchasing plants, I made a list of those that seemed like good choices. I depended for some of this on my friend Deb C, who is planning a similar garden, and who happens to be a trained horticulturist and certified Maryland Naturalist. She suggested we use matrix planting, in which we fill in the spaces between perennial flowers with native grasses that will crowd out the weeds, wiregrass, and crabgrass. Together we selected about half a dozen species of native perennials that would be good for our pollinator gardens.
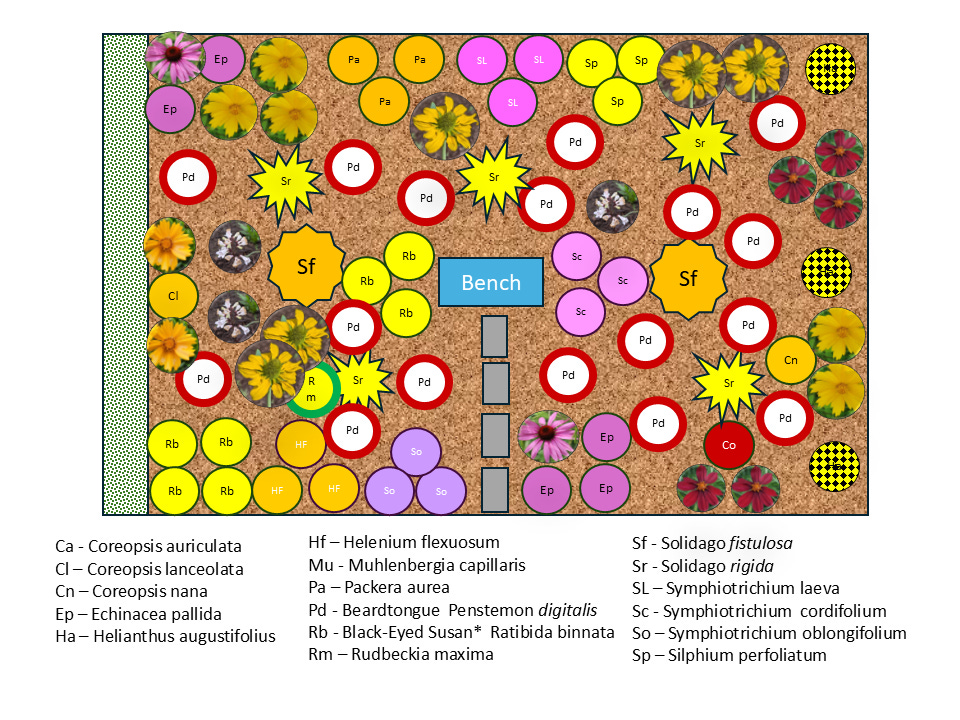
Some online research gave me approximate heights and widths of the mature plants. Using this, I made a plan with PP showing where I would place the plants. My plan was to plant them in alternating patches of 3-4 plants, so I would have a variety of colors like a chess board. A complete list of the plants I installed, along with their size, color, bloom period, and types of wildlife attracted is available HERE, along with a nifty chart of their blooming dates and colors.
In some locations, you may need permission to change your lawn, especially if you are part of a restrictive Home Owners Association (HOA). Fortunately, my HOA does not have any rules that would prevent establishing pollinator gardens, though it does require lawns to be maintained, and I once found a nastygram in my mailbox when I left it untended for two months while traveling. But if there is no lawn, I can’t mow it, can I? And my home state of Maryland has enacted legislation that prohibits placing restrictions on “low-impact landscaping”, which includes pollinator gardens, rain gardens, and other features that support wildlife. Plus, I’m on the HOA board (no hate mail, please), and I’ve already explained to the other members what I’m doing. So, being on the HOA board has its advantages.
Step Two: Remove the Lawn, Dawn
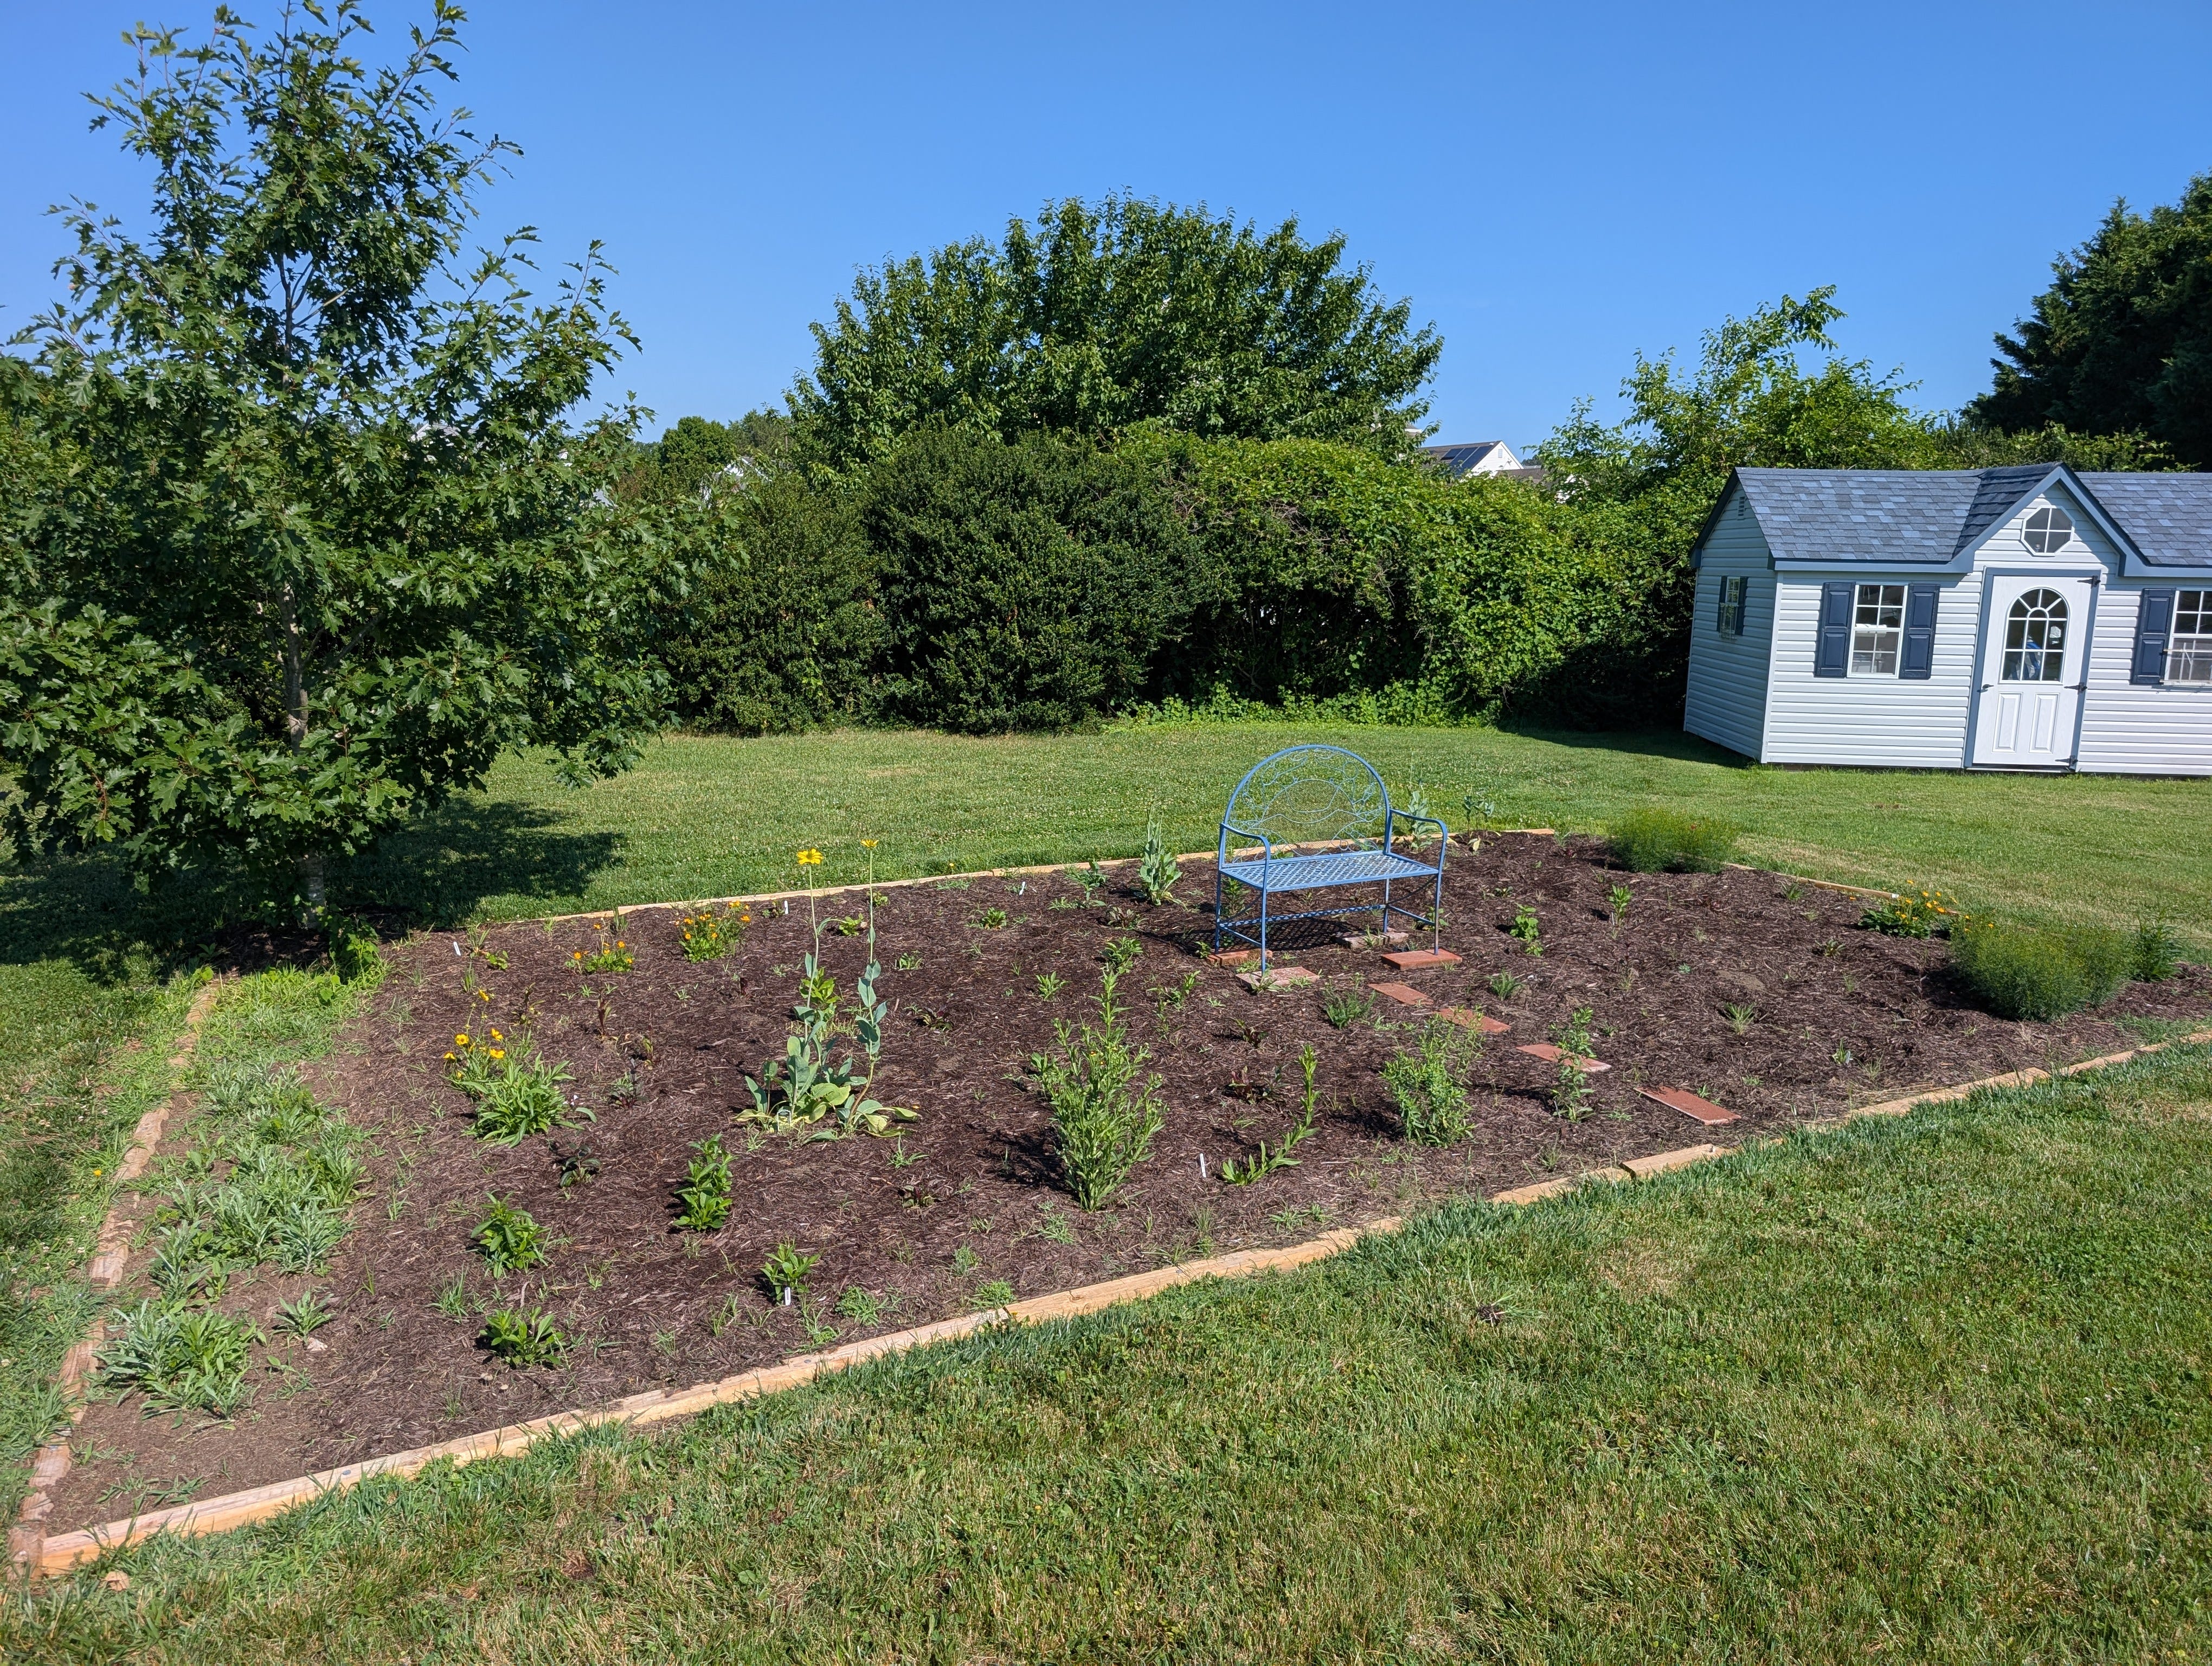
Before you plant, you need to remove the existing grass. You could dig it up, or plow it under, but both of those options are laborious. And poisoning it with weed killer would defeat the whole purpose of the garden. A better method is to solarize it by covering it with clear plastic and allowing the sun to bake it. I decided to start small and see how it works before expanding to the full area I had mapped out. So, in March of 2025, I laid a 20 x 30-foot tarp over half of my intended garden zone, staking the corners and edges, and laying some bricks on it to keep it from blowing away. For the rest of the year, I mowed carefully around it. That area (Zone 1) is about half of what I originally planned to convert.
Step Three: Prepare the Zone, Joan
In March 2026, as soon as the last of the snow melted, I removed the tarp, bricks, and stakes. The grass underneath was mostly yellow and dead. I then towed my heavy garden trailer to a nursery, filled it with two yards (= tons) of mulch, and spread that over half of the 20 x 30 garden zone. At this point I decided to rototill an extra strip of living lawn in order to sow some random wildflowers, for which I borrowed a rototiller from my friend Deb (which didn’t turn out well, as I just supercharged all the crabgrass. Should have covered and killed it first). Although I did not till the area I had already mulched, I decided to till the remaining half of the zone that I had not yet mulched; this is an experiment to see if tilling makes any difference to the final outcome. Having done that, I went back to the nursery for two more yards of mulch and spread it out.
After mulching I surrounded the plot with border timbers (rough cut 4 x 4s) that were staked into the ground. This phased turned out to be a lot of work and is making me think twice about the size of the final project.
Step Four: Get Your Plants, Vance
There are many sources for native plants. First, you need to find out what growing zone you live in. Then go online and learn what is recommended for your zone. You can buy from local nurseries, but I have found they mostly offer whatever they have and aren’t focused on native species. If you are lucky, there may be nurseries that specialize in native plants in your area. There are many online sources for plants, but you may need to buy in bulk. Some will even sell you a kit, with a paper map to lay on the ground showing the location for each plant. We ordered our plants from Ecoplantia but there are many other sources. A third source may be local non-profits or University extension services that sell native plants in the spring; these events are usually seasonal, so start looking for them in late winter.
Deb and I ordered flats containing 50 plugs of Beardtongue (Penstemon digitalis), a tall perennial with white flowers, and 70 plugs of Muhlenbergia, a tall, showy, reddish grass that will be our matrix filler. Our plants came as plugs that were about 4 inches deep and 1.5 inches diameter. Buying in large numbers kept the price down to about $3.50 per plug.
Another friend and master gardener, John M, alerted me to a plant sale and seminar on pollinator gardens offered by The Nanticoke Watershed Alliance (NWA). I immediately signed up, and in mid-May we attended the seminar and picked up our plants, which included 3 to 6 plugs each of multiple perennials (see list), for a total of about 30 plants. Included in that purchase were Coreopsis, otherwise known as Tickseed (which sounds like a haven for parasites), two types of Goldenrod (Solidago spp), Ragwort, Asters, Coneflowers, and sunflowers (see full list below). (Just looking at pictures of these makes me want to sneeze, but I’m told that they are not the sources of allergenic pollen, and I’m confusing them with ragweed, to which I know I’m allergic, but we’ll see.) Some of these items were not on my initial list, but they came as a package, and the price was good, about $3.00 each. I also purchased two dogwood saplings and three bayberry bushes for planting elsewhere.
Another source of native plants was an offering from the Lower Shore Land Trust (LSLT). From them, I purchased six quart-size pots each of two more varieties of Coreopsis and six pots of Rudbeckia maxima (i.e. AKA giant black-eyed Susans to us peonies). [Note: These are AWESOME plants and are already 3 feet tall with saucer sized flowers, that remind me of Audrey Two from Little Shop of Horrors. Check them out!]. These plants were rather expensive at $9.50 each, but they are large, and the money is going to a good cause, so WTF.


Step 5: Time to Install, Y’all
The first batch I planted was the mixed group of plants from the NWA. After removing the plugs from their containers, I laid them out on the mulched zone where I planned to plant them, according to my plan, in batches of three or four, at distances of one to two feet apart. For the first ten or so, I cleared a small area of mulch, then dug a hole with a hand shovel to plant them. But the soil, which is mostly sand, was hard-packed, and didn’t allow much room to grow. After that, I used a post-hole digger to dig a hole six inches wide and about eight inches deep, then replaced half the soil so there would be a soft bottom beneath the plugs. I placed the plugs or larger plants in the hole and filled in the dirt around them. Getting those plants in the ground required about four hours of labor.
The hard part of this using a long-handled shovel to scrape away enough of the mulch, which ranged from two to six inches deep, to get at the ground underneath. I needed to expose at least a square foot of ground to accommodate the hole, and a spot to dump the soil so it wouldn’t get mixed together with the mulch. After planting and backfilling, I covered the exposed soil as much as possible, leaving a crater in the mulch around the plant.
The following weekend I collected my large plants from the LSLT. I planted them using the same method - digging a deep hole and backfilling the bottom - again in groups of three spaced about one foot apart. By now, my initial plan had been filled out, partially with plants I didn’t plan on having, so for the final planting, I placed 25 plugs of Penstemon randomly around my Zone wherever there seemed to be gaps. These will be large plants, so I planted them individually rather than in groups. The plugs were small, though, and I realized it was simpler to dig out and refill the entire eight-inch-deep hole, then use a hand shovel to dig a four-inch hole in the loosened soil in which to place the plug. This second planting required another four hours.
Finally, in week three, I planted the Muhlenbergia grass. This is a matrix filler and the idea is to spread it around the open spaces between the other plants. For this operation, I got wise and bought a bulb augur – a corkscrew device that attaches to my portable drill. Using that, I just drilled a hole through the mulch into the soil, dropped in the plug, and tamped it with my foot. MUCH easier than digging. That task required another two hours of labor.
What’s The Tally, Sally?
At this point, I have committed about 24 hours of labor to the project, not counting my time doing online and book research. I have invested $870, about half of which was for plants, and the rest for tarps, mulch, border timbers, etc. I’m not including the cost of gas for driving back and forth to get plants and supplies which, due to Trump’s failed Iran War, probably added another $130 to the cost, so I’m going to round it all up to a nice even $1000.
What’s the Buzz, Cuz?
At some point in the future, I plan to install a Bee Hotel, but haven’t decided exactly how to build it yet, so that may take some time. My ultimate goal was to create two similarly sized gardens separated by a walkway, but I’m not yet sure I want to invest the same amount of time and effort into the project next year. We’ll see.
Meanwhile, I check on my plants daily to see that they are watered (I have sprinklers) and still alive. Some have already been nibbled on by the wild rabbits that I have allowed to continue living under my shed for several generations because I’m such a softy (see Bunny Gardens). It would be more work and expense to fence them out, so I don’t want to do it unless I must.

I can’t wait to see the garden in full bloom. I am keeping a weekly log of flowering times, which I will share with you in a later report. Some of the plants will flower in summer, and some not until fall, but in any season it should be a riot of color, and hopefully, a place full of bees, butterflies, and birds. Let the infestation begin.
Keeping up with the Joneses
Last weekend, I went on a tour of pollinator gardens with my wife and friends Deb and Suzie. I wanted to see how my feeble efforts compared to other people’s. In one yard, Rudbeckia was allowed to go wild, and it was pretty jungle-y. A few other yards had patches of pollinators spread around different parts of their yards. My friend Tom Horton, an extraordinary writer on subjects natural and unnatural, has collected many varieties of trees in his yard, which is now a dense urban forest. We only saw one other dedicated pollinator zone, attached to an elegant waterfront home. The owners had spared no expense – they had planted their garden on the same dates that I did, but they had purchased large, already-blooming plants, so their garden was already in full blossom. The final garden was in a recent housing development where our friend Maggi had campaigned to leave one house plot undeveloped, and had turned it into a community pollinator garden by carrying water in a bucket from her home.
I came away from that tour feeling like my meager efforts were on target. My garden was more organized than most I’d seen, was built in a more deliberate manner, and included a greater variety of plants. But they are still single individuals spread over a large area. It will take several years for them to spread out and reach their full potential. On arriving home from our tour, Deb and Suzie spotted some crabgrass in my wildflower patch and could not stop themselves from pulling it out by hand. Shamed by their example, I spent this morning pulling out the rest of it. I did not know weeding was going to be so much work, and if I want to maintain this garden, I will have to do it frequently.
I think I prefer mowing the lawn.

This issue of Ecologist at Large is available to all readers. However, if you would like to support my work with a one-off contribution, click “Buy me a coffee” below.
Resources
https://beecityusa.org/#
https://pollinator.org/
the bees, bugs, and other critters will thank you for your persistence
Excellent description of the processes and accompanying emotions and frustrations. I am also trying to reduce the amount of lawn. We have in a more hodgepodge manner. Have planted native plants on half of our septic mound and let the other half go wild with golden rod, which are one of the most potent pollinator attractors. I have simply left unmowed part of the lawn with varying results. While they are mostly non-native flowers I’ve found a lot of both pollinators and a huge number of insects ranging from grasshoppers to spiders to leafhoppers and so on, so figure it is better than simply mowing. I also have some more formal gardens that are mostly native plants, waiting for them to attain more bulk so I can see how things progress. Bees are one of my curiosities, and I have found a variety of native bees, but also several non-native bees, other than the honeybee. Fascinating process. Thanks for sharing and keep it coming!